HTML/PHP3/JavaScript Tutorial
| ★ wanayoo — archive 1999 http://codeforge.com/tutorials/PHPTutorial.html | Nouvelle recherche | Portail wanayoo |
|
|
HTML/PHP3/JavaScript Tutorial |
 |
|
ConfigurationFor this tutorial you need a properly installed Apache web server and PHP3: Hypertext Preprocessor. For JavaScript, you'll need corresponding browser (for example Netscape Navigator). Apache in this tutorial is compiled and configured in user directory ('Port' - 8080 and the 'DocumentRoot' - ~/httpd/html). PHP3 is complied and configured also in user directory, as Apache Module. If you want to check the syntax of PHP sources from inside the C-Forge, you must compile PHP3 as CGI binary and place it to one of $PATH directories. Creating new projectLaunch C-Forge and press the button to create new project. button to create new project.
The New Project dialog appears. Use the "Browse" button to point Project Root to the same directory, as your Apache 'DocumentRoot' setting. Enter the name of your new project. Uncheck 'Create project subdiectory' and 'Use working project version'. (If you leave the first checkbox enabled, all files for this project will be placed in a newly created subdirectory. The second checkbox disables the use of the Working directory because HTML do not support this type of project layout.)
Creating new targetPress the OK button. The New Target dialog will appear, where you must describe the first target in your project. As is customary for HTML projects - lets name it 'index.html'. Note, that the target Type must be Hyper Text File.
Press the OK button. Target editingThe Project Desktop window should appear. To lock and edit 'index.html' - Drag'n'Drop it (using the middle mouse button ) from the Dependency Tree to Working Area, as shown at the next picture:
The file will be placed into the Integrated Smart Editor, where you can edit it as shown at the next image:
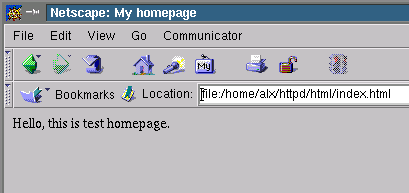
Testing the TargetTo test the target, press the F5 key inside the editor or simply Drag'n'Drop the icon from Project Desktop into Netscape window. The file will then be opened in Netscape (Note: Netscape must be running at this moment and its executable accessible through the $PATH environment variable).
Adding a PHP targetsYou can add a new target to the project by clicking on the Add Target button located on the toolbar. In addition to this, existing script targets can be added to the project through the use of Drag'n'Drop. Lets add a targets to the project using this functionality. For the purpose of this exercise, download this archive and unpack it.Switch to the Disk view in the Project Desktop, as shown at the image below. Locate unpacked PHP3 files. Select the files about.php3 and mailme.php3 and drag'n'drop them (using middle mouse button) to the 'Root' folder of the Dependency Tree as shown below:
The Add New Targets dialog is appear. Be sure, that the Type is selected 'PHP3 script':
Adding a PHP includes and JavaScript sourceTo see All files into the 'Disk' panel - change the filter (in the popup menu) to view All files, not only All Source files. As you can see, there are still two PHP3 source files (begin.php3 and end.php3) in this archive. They are included in each of the PHP3 targets to create some decorations on your site. There is also preload.js - JavaScript source which is used to preload menu images. To add all of them into the project as includes drag'n'drop them to the 'Includes' folder of the Dependency Tree. The Add New Files dialog appears (note, that 'Add as include' check box must be enabled):
Adding imagesThere are also some images in the archive. To add them into the project, create the macro (using 'Add macro' button - ).
Enter the macro name (for example IMAGES).
And now, select all images on the Disk panel and Drag'n'Drop them to the macro icon on the Dependency Tree.
The Add New Files dialog is appear. Press OK to add them into the project. ).
Enter the macro name (for example IMAGES).
And now, select all images on the Disk panel and Drag'n'Drop them to the macro icon on the Dependency Tree.
The Add New Files dialog is appear. Press OK to add them into the project.
Editing filesSwitch to a small icons (Ctrl-Alt-V), select all PHP3 files plus the JavaScript file and Drag'n'Drop them to the Working Area:
Switch to a small icons (Ctrl-Alt-V), select all PHP3 files plus the JavaScript file and Drag'n'Drop them to the Working Area:
To setup this test project, you'll need to change the name and where the mail from homepage would be sent to:
Let's test the error checking in IDE. To do this, make the error inside the source and press the F5 key. If you have PHP CGI binary installed as described above, then the 'php' program will be executed and error line bookmarked automatically in the Editor:
The result of PHP preprocessing is redirecting to the Project Log window:
Insert ';' at the end of 'echo' command. Testing the projectTo test the project you will need to access to HTML/PHP files you have created through the Apache. Enter your homepage URL with the name 'mailme.php3' in Netscape (or another browser) and press return. The browser will display the 'mailme' page:
Pressing the 'Send mail' button executes the PHP3 code in file mailme.php3 with the initialized variables $name and $mail_address. So, the mail() function is called, and mail is sent.
|
|
Copyright © Code Forge, Inc. 1997-99. All rights reserved.
Last modified: Thursday, 30-Sep-1999 02:13:34 MDT